about bad renovations - all the bad renovations - latest bad updates - bad feedback - good people

our bad renovations:

Move in Condition
Master Bedroom
The Den
Half Bath (Downstairs)
Pointed Arch Destruction
Garage / Workshop
Hallway Facelift
New Windows
Load Bearing Beam
Kitchen Renovation Part 1
Kitchen Renovation Part 2
Dining Room
Basement
Pool Renovation
Dining Room Table
Formal Living Room
Nursery
Electrical Rewiring
Bedrooms
Air Conditioning / Heat Pumps
Front Porch
Outdoor Living
Landscaping


303: Here's what we started with in our formal Livingroom.

Here's what we started with in our formal Livingroom. (08/29/2012)

304: The bay window, and a close p view of the nasty green carpet.

The bay window, and a close p view of the nasty green carpet. (08/29/2012)

305: The first order of business in the Living Room is tiling a small area for the pellet stove.  Here we started pulling up the carpet, padding, and vinyl tile to get down to the  slab.

The first order of business in the Living Room is tiling a small area for the pellet stove. Here we started pulling up the carpet, padding, and vinyl tile to get down to the slab. (11/20/2013)

306: The tile for the pellet stove is down, and we cut into the wall to frame out for the vent pipe thimble.

The tile for the pellet stove is down, and we cut into the wall to frame out for the vent pipe thimble. (11/20/2013)

307: Grout is going down.  The lines are pretty uniform despite the fact we did them by eye.

Grout is going down. The lines are pretty uniform despite the fact we did them by eye. (11/21/2013)

308: The finished hearth.  You can also see some evidence of 30 year old termite damage where we pulled the radiator covers.  Luckily the framing is all in good condition, and the termites have long since been treated.

The finished hearth. You can also see some evidence of 30 year old termite damage where we pulled the radiator covers. Luckily the framing is all in good condition, and the termites have long since been treated. (11/21/2013)

309: Here's the framining for the wall thgimble to secure to.

Here's the framining for the wall thgimble to secure to. (11/22/2013)

310: Sheetrock back up, wall thimble and outside air kit are in place.  Ready to run the vent pipe.

Sheetrock back up, wall thimble and outside air kit are in place. Ready to run the vent pipe. (11/23/2013)

311: We ran the vent pipe through the wall, and up the side of the house.  The kit fit perfectly using only one 12

We ran the vent pipe through the wall, and up the side of the house. The kit fit perfectly using only one 12" horizontal section. The red stuff is high temp RTV to seal the double wall pipe and keep exhaust gasses from leaking. (11/23/2013)

312: We attach the vent pipe to the stove using the included collar and a ton of RTV.   I would have preferred some kind of clamp, but it doesnt seem to be common practice.

We attach the vent pipe to the stove using the included collar and a ton of RTV. I would have preferred some kind of clamp, but it doesnt seem to be common practice. (11/23/2013)

313: Our first burn.  The glass will never be this clean again.  The stove throws off plenty of heat.  It doesnt quite reach the den on the other side of the house, but it does make its way upstairs.  It may not completely replace our oil heat, but I'm confident it will go a long way towards reducing our oil consumption.

Our first burn. The glass will never be this clean again. The stove throws off plenty of heat. It doesnt quite reach the den on the other side of the house, but it does make its way upstairs. It may not completely replace our oil heat, but I'm confident it will go a long way towards reducing our oil consumption. (11/23/2013)

326: The new ceiling fan has been hung and wired.  It does quite a bit to help distribute the heat to the rest of the house.

The new ceiling fan has been hung and wired. It does quite a bit to help distribute the heat to the rest of the house. (12/02/2013)

327: My Dad talked me into replacing the aluminum wiring in the living room BEFORE doing all the moulding and coiffered ceiling.  Here are two of the many access holes I needed to cut to fish the new copper to the extsing outlets.

My Dad talked me into replacing the aluminum wiring in the living room BEFORE doing all the moulding and coiffered ceiling. Here are two of the many access holes I needed to cut to fish the new copper to the extsing outlets. (12/02/2013)

328: More access holes to energize the fan and switches, as well as feed the existing outlet.

More access holes to energize the fan and switches, as well as feed the existing outlet. (12/02/2013)

329: More sheetrock work to do after running the romex to the ceiling fan as well as the outlet across the room.

More sheetrock work to do after running the romex to the ceiling fan as well as the outlet across the room. (12/02/2013)

330: Added an outlet directly behind the pellet stove that way I dont need to use an extension cord anymore.

Added an outlet directly behind the pellet stove that way I dont need to use an extension cord anymore. (12/02/2013)

331: Instead of coming down from the ceiling as the old aluminum wiring did, or running it across at outlet height, we opted to run it behind the baseboards instead.  The sheetrock was a mess from termite damage many years ago, so it needed to be replaced anyway.  The rads will cover up the work anyway.

Instead of coming down from the ceiling as the old aluminum wiring did, or running it across at outlet height, we opted to run it behind the baseboards instead. The sheetrock was a mess from termite damage many years ago, so it needed to be replaced anyway. The rads will cover up the work anyway. (12/02/2013)

332: Fishing the romex through this tight corner was a nightmare.  Took a lot of picking away at it, and fishing with a coat hanger, but we finally got it though.

Fishing the romex through this tight corner was a nightmare. Took a lot of picking away at it, and fishing with a coat hanger, but we finally got it though. (12/02/2013)

333: Patchwork done to the wall and ceiling

Patchwork done to the wall and ceiling (12/18/2013)

334: We pulled the curtain valence down and patched up the holes for the electrical and damage from the demo.

We pulled the curtain valence down and patched up the holes for the electrical and damage from the demo. (12/18/2013)

335: Looks so much better without that 70's era curtain valence.  Watch, it will probably be back in style next year.

Looks so much better without that 70's era curtain valence. Watch, it will probably be back in style next year. (12/18/2013)

336: Spent all night tearing up the carpet.  We also threw out the old rug.

Spent all night tearing up the carpet. We also threw out the old rug. (12/18/2013)

337: We misted down the area and tarped it off to control the dust while we gently pried up the tiles with the floor scraper.  Luckilly the tiles practically jumped off the floor themselves, usually in one piece.

We misted down the area and tarped it off to control the dust while we gently pried up the tiles with the floor scraper. Luckilly the tiles practically jumped off the floor themselves, usually in one piece. (12/19/2013)

338: Paint goes up.  The first color choice was a little too lavendar for our liking, so we had to repaint with a battleship grey leaning towards olive.

Paint goes up. The first color choice was a little too lavendar for our liking, so we had to repaint with a battleship grey leaning towards olive. (12/20/2013)

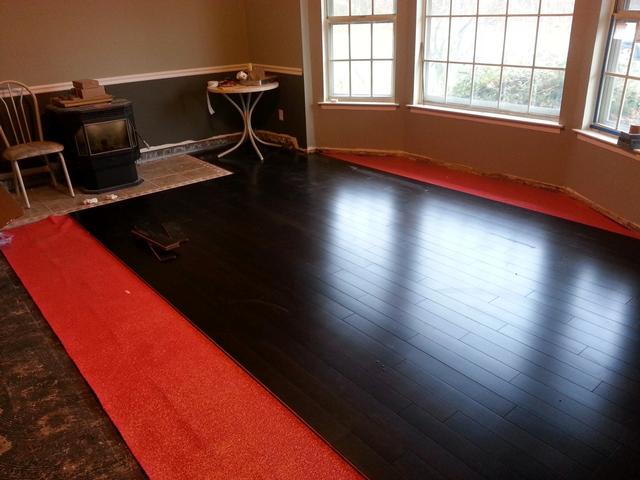
339: We started laying the bamboo flooring down.  Its the same bamboo we used in the den.  After a year, we do have some slight cupping due to slight moisture in the slab in the den, so we decided to float the floor in the living room instead of gluing it directly to the slab.  This let us use a proper moisture barrier.  The feel may be a little less solid, but I'm hoping its not unreasonable.

We started laying the bamboo flooring down. Its the same bamboo we used in the den. After a year, we do have some slight cupping due to slight moisture in the slab in the den, so we decided to float the floor in the living room instead of gluing it directly to the slab. This let us use a proper moisture barrier. The feel may be a little less solid, but I'm hoping its not unreasonable. (12/22/2013)

340: The moisture barrier consists of styrofoam beads sandwiched between two layers of plastic.  The bottom layer is semi permeable, so moisture can escape and air can flow through the spaces between tiny beads.  We are gluing the tongue and grooves together with flooring specific PVAc glue.

The moisture barrier consists of styrofoam beads sandwiched between two layers of plastic. The bottom layer is semi permeable, so moisture can escape and air can flow through the spaces between tiny beads. We are gluing the tongue and grooves together with flooring specific PVAc glue. (12/22/2013)

341: We had to free cut the narrow bay window angles on the table saw since the mitre saw tops out around 50 degrees.

We had to free cut the narrow bay window angles on the table saw since the mitre saw tops out around 50 degrees. (12/23/2013)

342: I originally built the step with 2x6 and it was too high, so I rebuilt with 2x4s, and shimmed below to make up the height.   Its about a half inch low, but I wasn't about to build it a third time.

I originally built the step with 2x6 and it was too high, so I rebuilt with 2x4s, and shimmed below to make up the height. Its about a half inch low, but I wasn't about to build it a third time. (12/23/2013)

345: We installed the radiator covers, but still have to add trim around the tile.

We installed the radiator covers, but still have to add trim around the tile. (01/06/2014)

355: So today we're starting on the coffered ceiling.  The ceremonial first beam goes up.  Notice the deadman holding the 2x4 in place against the wall.  This thing did all the work while Dan, who was supposed to be my helper, socialized with the ladies.  Thanks Dan.  Employee of the month award is going to the inanimate wood plank.

So today we're starting on the coffered ceiling. The ceremonial first beam goes up. Notice the deadman holding the 2x4 in place against the wall. This thing did all the work while Dan, who was supposed to be my helper, socialized with the ladies. Thanks Dan. Employee of the month award is going to the inanimate wood plank. (02/22/2014)

356: The topmost layer of 2x4x10s goes perpendicular to the ceiling joists, and was screwed in quite heavily with 3 inch construction screws.  Two boards end to end fit perfectly in the 20 foot long room.

The topmost layer of 2x4x10s goes perpendicular to the ceiling joists, and was screwed in quite heavily with 3 inch construction screws. Two boards end to end fit perfectly in the 20 foot long room. (02/22/2014)

357: The lower boards were 2x4x14's to span the entire thirteen foot width of the room.  Since these are parallel with the joists, and may not line up, we hung them off the top boards.

The lower boards were 2x4x14's to span the entire thirteen foot width of the room. Since these are parallel with the joists, and may not line up, we hung them off the top boards. (02/22/2014)

358: Now we added some additional 2x4 blocking to give us something to tie the bottom fascia boards into.  We also added blocking at the wall, and angle screwed it into the wall's top plate with 4

Now we added some additional 2x4 blocking to give us something to tie the bottom fascia boards into. We also added blocking at the wall, and angle screwed it into the wall's top plate with 4" framing screws. (02/22/2014)

359: The bottom fascia is painted 5/4 board.  We tacked these into place with brad nails, then added rosettes between them all to avoid having continuous runs and scarf joints or seams.

The bottom fascia is painted 5/4 board. We tacked these into place with brad nails, then added rosettes between them all to avoid having continuous runs and scarf joints or seams. (02/23/2014)

360: With the bottom finished, we can start the moulding buildup on the sides.  We started by casing each box in 3-1/4 colonial base moulding.  We budgeted 360 linear feet, but used closer to 280, after carefully calculating our cuts to reduce waste.

With the bottom finished, we can start the moulding buildup on the sides. We started by casing each box in 3-1/4 colonial base moulding. We budgeted 360 linear feet, but used closer to 280, after carefully calculating our cuts to reduce waste. (02/23/2014)

361: With all the base moulding in place, we can start with the 2-1/2 crown moulding to finish each square.  This was my first test cut, so the angles are a bit off.  Once I dial them in, I will re-do the crown in this first square, but I was running out of steam for the night.

With all the base moulding in place, we can start with the 2-1/2 crown moulding to finish each square. This was my first test cut, so the angles are a bit off. Once I dial them in, I will re-do the crown in this first square, but I was running out of steam for the night. (02/24/2014)

362: Moving along with the crown moulding.  Got two of the three rows done.  We repositioned the moulding in the first square, and while it looks better, some gaps remain. As long as I have an extra run of moulding, I will re-cut this square at the end.

Moving along with the crown moulding. Got two of the three rows done. We repositioned the moulding in the first square, and while it looks better, some gaps remain. As long as I have an extra run of moulding, I will re-cut this square at the end. (02/25/2014)

363: And the coffered ceiling is done - save for some minor touchups.  I have one small gap remaining in one corner.  I may try and rut the brad with the multitool and reposition the corner in place, or I may simply caulk it.  Otherwise I'm fairly happy with the way it came out.

And the coffered ceiling is done - save for some minor touchups. I have one small gap remaining in one corner. I may try and rut the brad with the multitool and reposition the corner in place, or I may simply caulk it. Otherwise I'm fairly happy with the way it came out. (02/26/2014)

364: The pictureframe wainscoting begins.  We are going with upper AND lower wainscoting for a nice formal look.  And also because, as I was just informed, I have a rectangle fetish.

The pictureframe wainscoting begins. We are going with upper AND lower wainscoting for a nice formal look. And also because, as I was just informed, I have a rectangle fetish. (02/27/2014)

365: The nearly finished product.  It's in desperate need of a good swiffering.

The nearly finished product. It's in desperate need of a good swiffering. (02/28/2014)

366: Theres a few pieces of moulding I may want to adjust if not completely remove and re-nail.  But some alignment issues are simply because of imperfections in the wall.  Ill do what I can to dial it in, but I'm fairly happy with the outcome so far.

Theres a few pieces of moulding I may want to adjust if not completely remove and re-nail. But some alignment issues are simply because of imperfections in the wall. Ill do what I can to dial it in, but I'm fairly happy with the outcome so far. (02/28/2014)

we love to get feedback, so here's your chance to tell us just how bad we did. chances are we already know just how bad it really is...

your name
your email
(only if you want a scathing response)
what's a matta'?
bad feedback
what's my name?
(Spam Control)

some insensitive jerkwads have said:

jeff notti said,
that is a totally bad renovation. really bad. so bad. speechlessly bad. bad ass even.
on 07-Mar-14